DIY Wedding Anniversary Gifts
- Aug 11, 2017
- 4 min read

This year for our wedding anniversary, my husband and I decided to create DIY gifts for each. I created a rustic plaque with a picture from our wedding day and a mod podge scrapbook lake house. My husband created a creative book jewelry box.

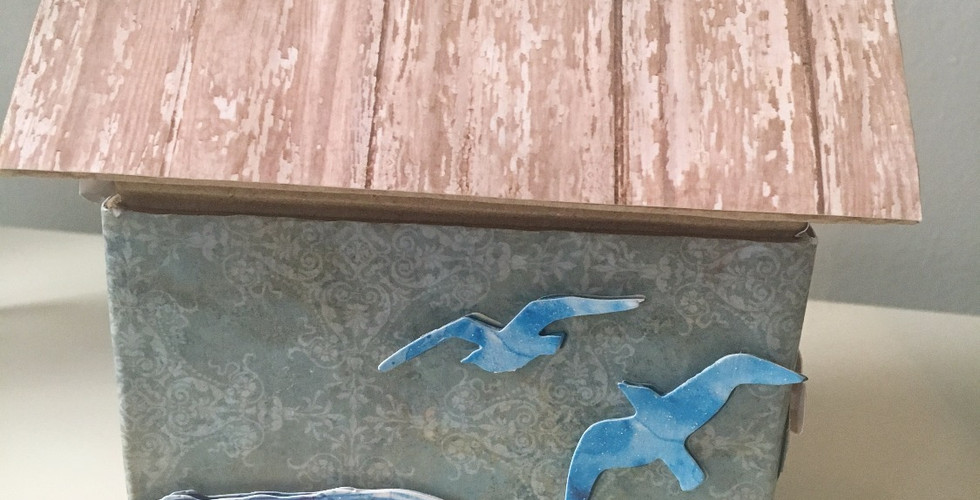
There is a Hobby Lobby Arts & Crafts Store nearby my house. I brought the majority of the material for this project there. As I was walking through the aisles for inspiration, I saw a small paper mache house. Hobby Lobby had three different sizes which I chose the smaller house. I loved the idea of using this house as a time capsule box. My vision was to use mod podge to adhere the scrapbook paper onto it and write inside the goals that we wanted to accomplish in the next year. Then when it was our second year anniversary, open the house and read what we wrote.
I chose to create a lake house theme because we have always talked about one day owning a lake house since we love the outdoors. I quickly ran to the scrapbook section and started looking for paper that would mimic a house. Several minutes later, I had five different scrapbook papers. One for the roof, one for the whole house, one to create the windows, one for the grass and one for the inside part of the house. I also brought matte mod podge and an xacto knife.
Once I got home, I worked on this project first. I opened up the house and measured the width around the house with my rustic blue scrapbook paper. Then, I cut the blue paper into fourths. I coated the bottom half of the house in sections with mod podge then placed the scrapbook paper. I repeated this process until the whole bottom of the house was covered. Afterwards, I used the left over blue scrapbook paper to decorate the top parts of the house.
I repeated this process with the different rustic scrapbook papers for each part of the house. I used the xacto knife to cut out the "windows" for a clean look. Once I covered the house with the scrapbook paper, I used mod podge to coated the whole house evenly. This first part of the project took about thirty minutes to complete. I then put the house in a safe place for it to dry overnight.
The next day, I made sure that everything was coated with the mod podge and dried evenly. Using the xacto knife, I cut out the windows and the door. I felt like something was missing. I love scrapbooking, so I had tons of stickers that I have collected over the years. Personally, I knew I wanted the stickers to be three dimensional since the house was flat. After adding the stickers, the rustic lake house came to life!


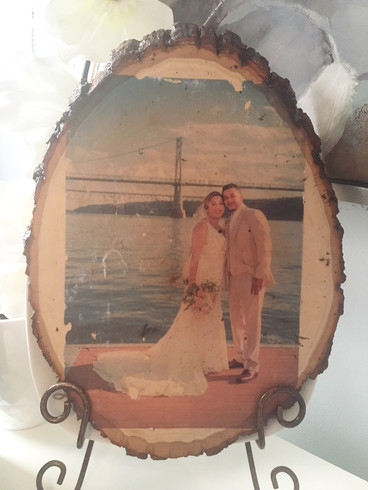


The next project I worked on was my rustic plaque. I had seen on Pinterest photo wood transferring projects. This sparked my interested because my husband saw something similar at our wedding photographer's studio last year and loved it. I knew I had to recreate this.
When I was in Hobby Lobby, they had many aisles of different types of wood and different finishes of wood. I ended up getting the Walnut Hollow Basswood Country Round. In the same aisle I found wooden bird shapes that I wanted to incorporate into the project. Then I headed towards the scrapbooking section for embellishments. Here is where I found the three burlap flowers. I also brought Elmer's Wood Glue to adhere the birds onto the wood.
I followed the same steps that I read from an article and watched a Youtube video on how to complete the photo transfer on wood. But it didn't turn out as planned. If you look at the picture above on the left side, it did transfer nicely. However, the wooden plaque broke into little pieces of wood all on the picture. This part didn't bother me as much but after applying the mod podge over it to seal it, it made the picture very cloudy. Later I learned I needed a gel medium that wasn't explained in the article.
Since I planned ahead in case the project didn't work out, I went to Walmart to print out the same picture so I could decoupage it. I flipped over the same wooden plaque and first sealed all of the wooden edges with mod podge. Then I put a little mod podge in the center of the wood so I can place the picture on top. This allowed me to center the picture perfectly. I used the xacto knife to cut the picture in an oval shape that mimicked the wood plaque. Afterwards, I mod podged the whole picture onto the wood and mod podge the rest of wooden plaque. I let it set over night in a safe place. In the morning, I placed the flowers and birds along the bottom half of the plaque since I felt it framed the picture nicely. And processed to glue them all down. I love the way it turned out!


My husband was so thoughtful and created me a custom jewelry box. Since this was a gift, I won't be linking any of the items but will explain what he did.
My husband explained to me that he wanted to create this gift for me since I don't have a specific place where I keep my wedding bands / necklaces. He went to Michaels to get a book box and several other stores to get black felt, command hooks, stickers, Velcro and two rubber sewing thimbles. He attached the two command hooks first to hang my necklaces. Then, cut the rubber thimbles slightly to fit my wedding bands. He adhered the thimbles to the book box and covered the whole inside with felt. On the back of the book box, he attached a strip of Velco. This will be used for my longer necklaces. I was in shock when I received it & blown away that he create it. Honestly, it looked like he brought the whole thing at a store. To my surprise, he also brought me jewelry to go with it.
Now I have a place for all my beautiful jewelry and can hide it in my book shelf if I needed to.
Comments